我们谈及docker,都知道docker容器本质上是宿主机的进程,Docker通过namespace实现了资源隔离,通过cgroups实现了资源限制,接下来先聊聊namespaces是怎么一回事。
namespace是什么
Namespace是将内核的全局资源做封装,使得每个namespace都有一份独立的资源,因此不同的进程在各自的namespace中对同一种资源的使用不会互相干扰。
——摘自《Docker进阶与实战》
举个例子,执行sethostname这个系统调用时,可以改变系统的主机名,这个主机名就是一个内核的全局资源,内核通过UTS Namespace,可以将不同的进程分隔在不同的UTS namespace中,在某个Namespace修改主机名时,另一个Namespace中的主机名还是保持不变。
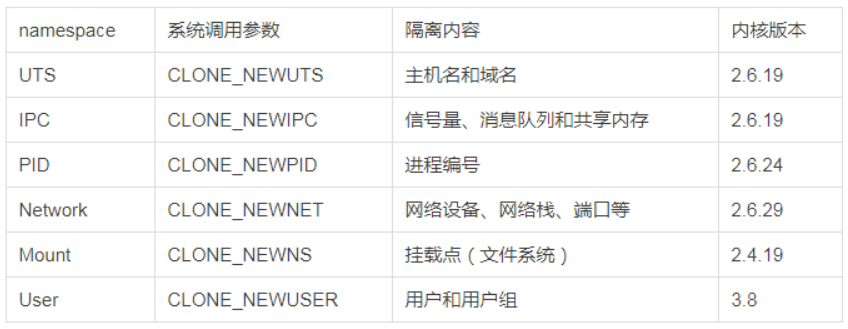
说白了docker就是通过namespace使得进程在资源视图上实现隔离,目前linux共实现了6种namespace
接下来进行些实验来更好的理解namespace是如何进行隔离的。
namespace实验 打开一台linux服务器,我们知道进程相关的信息都会在/proc目录下,如下图,/proc下的每个数字就代表了linux系统中的一个进程。
1
2
3
4
5
6
7
8
9
10
11
[root@slions_pc1 ~]# ls /proc/ 1 10149 10683 11 18 26 3002 36 4317 4331 5 8035 8806 8833 9631 cmdline fb keys misc schedstat sysvipc 10 10150 10700 11097 19 27 3006 37 4321 4400 51 8042 8813 8836 9639 consoles filesystems key-users modules scsi timer_list 10019 10152 10704 11122 2 2722 3060 38 4322 4413 53 8052 8814 8864 98 cpuinfo fs kmsg mounts self timer_stats 10023 10164 10706 11124 20 28 3074 4271 4325 4415 66 8059 8815 8876 9926 crypto interrupts kpagecount mpt slabinfo tty 10025 10581 10741 12 21 29 3087 4273 4326 4423 7 8069 8816 8925 acpi devices iomem kpageflags mtrr softirqs uptime 10060 10582 10865 13 22 2909 3095 4283 4327 46 8 8795 8817 9 asound diskstats ioports loadavg net stat version 10093 10586 10912 14 23 2911 3099 4286 4328 47 8017 8796 8820 9407 buddyinfo dma irq locks pagetypeinfo swaps vmallocinfo 10100 10588 10924 15 24 2947 3104 4307 4329 48 8024 8797 8821 9408 bus driver kallsyms mdstat partitions sys vmstat 10148 10628 10940 16 25 3 35 4313 4330 49 8029 8801 8830 9411 cgroups execdomains kcore meminfo sched_debug sysrq-trigger zoneinfo
每个数字目录下的ns目录就代表这个进程的namespace。
我们随便选取2个进程,查看其ns目录中的文件可以发现里面就对应着上边讲的linux 的6种namespace,每一项 namespace 都附带一个编号,这是唯一标识 namespace 的,如果两个进程指向的 namespace 编号相同,则表示它们同在该 namespace 下。可以看到进程为1和10的各种namespace编号都一样,所以它们同属一个namespace下。
1
2
3
4
5
6
7
8
9
10
11
12
13
14
15
16
17
[root@slions_pc1 ~]# ll /proc/1/ns/ 总用量 0 lrwxrwxrwx. 1 root root 0 7月 10 12:01 ipc -> ipc:[4026531839] lrwxrwxrwx. 1 root root 0 7月 10 12:01 mnt -> mnt:[4026531840] lrwxrwxrwx. 1 root root 0 7月 10 12:01 net -> net:[4026531956] lrwxrwxrwx. 1 root root 0 7月 10 12:01 pid -> pid:[4026531836] lrwxrwxrwx. 1 root root 0 7月 10 12:01 user -> user:[4026531837] lrwxrwxrwx. 1 root root 0 7月 10 12:01 uts -> uts:[4026531838] [root@slions_pc1 ~]# ll /proc/10/ns/ 总用量 0 lrwxrwxrwx. 1 root root 0 7月 10 12:01 ipc -> ipc:[4026531839] lrwxrwxrwx. 1 root root 0 7月 10 12:01 mnt -> mnt:[4026531840] lrwxrwxrwx. 1 root root 0 7月 10 12:01 net -> net:[4026531956] lrwxrwxrwx. 1 root root 0 7月 10 12:01 pid -> pid:[4026531836] lrwxrwxrwx. 1 root root 0 7月 10 12:01 user -> user:[4026531837] lrwxrwxrwx. 1 root root 0 7月 10 12:01 uts -> uts:[4026531838]
现在我启动一个docker进行测试。
1
2
3
4
5
6
7
8
9
10
11
12
13
14
15
16
17
18
[root@slions_pc1 ~]# docker run -d tomcat Unable to find image 'tomcat:latest' locally latest: Pulling from library/tomcat 0bc3020d05f1: Pull complete a110e5871660: Pull complete 83d3c0fa203a: Pull complete a8fd09c11b02: Pull complete 96ebf1506065: Pull complete b8bf70f9cc4d: Pull complete 3f6da67b9e68: Pull complete 257407776119: Pull complete 7bd0a187fb92: Pull complete 307fc4df04c9: Pull complete Digest: sha256:a5abf192aceed45620dbb2e09f8abdec2b96108b86365a988c85e753c28cd36b Status: Downloaded newer image for tomcat:latest 78192daee11695b6f2d973e4998c4f7a84b855b84f3a88ebe1ed5653d499d934 [root@slions_pc1 ~]# ps -elf|grep [t]omcat 4 S root 42799 42780 1 80 0 - 894104 futex_ 12:34 ? 00:00:05 /usr/local/openjdk-11/bin/java -Djava.util.logging.config.file=/usr/local/tomcat/conf/logging.properties -Djava.util.logging.manager=org.apache.juli.ClassLoaderLogManager -Djdk.tls.ephemeralDHKeySize=2048 -Djava.protocol.handler.pkgs=org.apache.catalina.webresources -Dorg.apache.catalina.security.SecurityListener.UMASK=0027 -Dignore.endorsed.dirs= -classpath /usr/local/tomcat/bin/bootstrap.jar:/usr/local/tomcat/bin/tomcat-juli.jar -Dcatalina.base=/usr/local/tomcat -Dcatalina.home=/usr/local/tomcat -Djava.io.tmpdir=/usr/local/tomcat/temp org.apache.catalina.startup.Bootstrap start
查看此docker进程的namespace信息 , 对比之前宿主机进程不难看出,它们已经进行了隔离。
1
2
3
4
5
6
7
8
9
10
11
12
13
14
15
16
17
[root@slions_pc1 ~]# ll /proc/42799/ns 总用量 0 lrwxrwxrwx. 1 root root 0 7月 10 12:44 ipc -> ipc:[4026532503] lrwxrwxrwx. 1 root root 0 7月 10 12:44 mnt -> mnt:[4026532501] lrwxrwxrwx. 1 root root 0 7月 10 12:34 net -> net:[4026532506] lrwxrwxrwx. 1 root root 0 7月 10 12:44 pid -> pid:[4026532504] lrwxrwxrwx. 1 root root 0 7月 10 12:44 user -> user:[4026531837] lrwxrwxrwx. 1 root root 0 7月 10 12:44 uts -> uts:[4026532502] [root@slions_pc1 ~]# ll /proc/1/ns 总用量 0 lrwxrwxrwx. 1 root root 0 7月 10 12:01 ipc -> ipc:[4026531839] lrwxrwxrwx. 1 root root 0 7月 10 12:01 mnt -> mnt:[4026531840] lrwxrwxrwx. 1 root root 0 7月 10 12:01 net -> net:[4026531956] lrwxrwxrwx. 1 root root 0 7月 10 12:01 pid -> pid:[4026531836] lrwxrwxrwx. 1 root root 0 7月 10 12:01 user -> user:[4026531837] lrwxrwxrwx. 1 root root 0 7月 10 12:01 uts -> uts:[4026531838]
上述实验只是验证了一个docker启动后namespace的隔离性,显然对于namespace的理解还远远不够,我们接下来再看看自己如何创建一个namespace。
创建namespace
对namespace的操作主要是通过clone(),setns(),unshare()来实现的。
其中clone用来创建新的进程和namespace,unshare用来为已有的进程创建namespace,而setns会将已有的进程放置到已有的namespace
通过调用 clone(),并传入需要隔离资源对应的参数flags(包括CLONE_NEWNS、CLONE_NEWPID、CLONE_NEWIPC、CLONE_NEWUTS、CLONE_NEWUSER、CLONE_NEWNET),创建出的新进程就处在全新的namespace中了(隔离什么我们自己控制)。
先看下clone()的用法,在机器上执行man clone找到例子。
1
2
3
4
5
6
7
8
9
10
11
12
13
14
15
16
17
18
19
20
21
22
23
24
25
26
27
28
29
30
31
32
33
34
35
36
37
38
39
40
41
42
43
44
45
46
47
48
49
50
51
52
53
54
55
56
57
58
59
60
61
62
63
64
65
66
67
68
69
70
71
72
73
74
75
76
77
78
79
80
81
82
83
84
85
86
87
88
89
90
EXAMPLE The following program demonstrates the use of clone() to create a child process that executes in a separate UTS namespace. The child changes the hostname in its UTS namespace. Both parent and child then display the system hostname, making it possible to see that the hostname differs in the UTS namespaces of the parent and child. For an example of the use of this program, see setns(2). Program source #define _GNU_SOURCE #include <sys/wait.h> #include <sys/utsname.h> #include <sched.h> #include <string.h> #include <stdio.h> #include <stdlib.h> #include <unistd.h> #define errExit(msg) do { perror(msg); exit(EXIT_FAILURE); \ } while (0) static int /* Start function for cloned child */ childFunc(void *arg) { struct utsname uts; /* Change hostname in UTS namespace of child */ if (sethostname(arg, strlen(arg)) == -1) errExit("sethostname"); /* Retrieve and display hostname */ if (uname(&uts) == -1) errExit("uname"); printf("uts.nodename in child: %s\n", uts.nodename); /* Keep the namespace open for a while, by sleeping. This allows some experimentation--for example, another process might join the namespace. */ sleep(200); return 0; /* Child terminates now */ } #define STACK_SIZE (1024 * 1024) /* Stack size for cloned child */ int main(int argc, char *argv[]) { char *stack; /* Start of stack buffer */ char *stackTop; /* End of stack buffer */ pid_t pid; struct utsname uts; if (argc < 2) { fprintf(stderr, "Usage: %s <child-hostname>\n", argv[0]); exit(EXIT_SUCCESS); } /* Allocate stack for child */ stack = malloc(STACK_SIZE); if (stack == NULL) errExit("malloc"); stackTop = stack + STACK_SIZE; /* Assume stack grows downward */ /* Create child that has its own UTS namespace; child commences execution in childFunc() */ pid = clone(childFunc, stackTop, CLONE_NEWUTS | SIGCHLD, argv[1]); if (pid == -1) errExit("clone"); printf("clone() returned %ld\n", (long) pid); /* Parent falls through to here */ sleep(1); /* Give child time to change its hostname */ /* Display hostname in parent's UTS namespace. This will be different from hostname in child's UTS namespace. */ if (uname(&uts) == -1) errExit("uname"); printf("uts.nodename in parent: %s\n", uts.nodename); if (waitpid(pid, NULL, 0) == -1) /* Wait for child */ errExit("waitpid"); printf("child has terminated\n"); exit(EXIT_SUCCESS); }
我们来参照例子写一个程序
1
2
3
4
5
6
7
8
9
10
11
12
13
14
15
16
17
18
19
20
21
22
23
24
25
26
27
28
29
30
31
[root@slions_pc1 test_namespace]# cat ns.c #define _GNU_SOURCE #include <sys/types.h> #include <sys/wait.h> #include <stdio.h> #include <sched.h> #include <signal.h> #include <unistd.h> #define STACK_SIZE (1024 * 1024) static char child_stack[STACK_SIZE];char * const child_args[] = { "/bin/bash" , NULL }; int child_main (void * args) printf ("在子进程中!\n" ); execv(child_args[0 ], child_args); return 1 ; } int main () printf ("程序开始:\n" ); int child_pid = clone(child_main, child_stack + STACK_SIZE, SIGCHLD, NULL ); waitpid(child_pid, NULL , 0 ); printf ("已退出\n" ); return 0 ; }
执行测试下:
1
2
3
4
5
6
7
8
9
10
[root@slions_pc1 test_namespace]# gcc -Wall ns.c -o ns.o [root@slions_pc1 test_namespace]# ls ns.c ns.o [root@slions_pc1 test_namespace]# ./ns.o 程序开始: 在子进程中! [root@slions_pc1 test_namespace]# exit exit 已退出
UTS隔离测试 修改代码,加入UTS隔离。
1
2
3
4
5
6
7
8
9
10
11
12
13
14
15
16
17
18
19
20
21
22
23
24
25
26
27
28
29
30
31
32
33
34
35
36
37
38
39
40
41
42
43
44
45
[root@slions_pc1 test_namespace]# cat ns.c #define _GNU_SOURCE #include <sys/types.h> #include <sys/wait.h> #include <stdio.h> #include <sched.h> #include <signal.h> #include <unistd.h> #define STACK_SIZE (1024 * 1024) static char child_stack[STACK_SIZE];char * const child_args[] = { "/bin/bash" , NULL }; int child_main (void * args) printf ("在子进程中!\n" ); sethostname("uts" ,12 ); execv(child_args[0 ], child_args); return 1 ; } int main () printf ("程序开始:\n" ); int child_pid = clone(child_main, child_stack + STACK_SIZE, CLONE_NEWUTS | SIGCHLD, NULL ); waitpid(child_pid, NULL , 0 ); printf ("已退出\n" ); return 0 ; } [root@slions_pc1 test_namespace]# gcc -Wall ns.c -o uts.o [root@slions_pc1 test_namespace]# ls ns.c ns.o uts.o [root@slions_pc1 test_namespace]# ./uts.o 程序开始: 在子进程中! [root@uts test_namespace]# hostname uts [root@uts test_namespace]# exit exit 已退出 [root@slions_pc1 test_namespace]# hostname slions_pc1
可以看到,加了CLONE_NEWUTS flags使得新进程的主机名发生了改变,并且不会影响其他进程的主机名。
PID隔离测试 下面再介绍下PID namespaces的实现,修改相关代码:
1
2
3
4
5
6
7
8
9
10
11
12
13
14
15
16
17
18
19
20
21
22
23
24
25
26
27
28
29
30
31
32
33
34
35
36
37
38
39
40
41
42
43
44
45
46
47
[root@slions_pc1 test_namespace]# cat ns.c #define _GNU_SOURCE #include <sys/types.h> #include <sys/wait.h> #include <stdio.h> #include <sched.h> #include <signal.h> #include <unistd.h> #define STACK_SIZE (1024 * 1024) static char child_stack[STACK_SIZE];char * const child_args[] = { "/bin/bash" , NULL }; int child_main (void * args) printf ("在子进程中!\n" ); sethostname("pid" ,12 ); execv(child_args[0 ], child_args); return 1 ; } int main () printf ("程序开始:\n" ); int child_pid = clone(child_main, child_stack + STACK_SIZE, CLONE_NEWPID | CLONE_NEWUTS | SIGCHLD, NULL ); waitpid(child_pid, NULL , 0 ); printf ("已退出\n" ); return 0 ; } [root@slions_pc1 test_namespace]# gcc -Wall ns.c -o pid.o [root@slions_pc1 test_namespace]# ^C [root@slions_pc1 test_namespace]# echo $$ 10588 [root@slions_pc1 test_namespace]# gcc -Wall ns.c -o pid.o [root@slions_pc1 test_namespace]# ./pid.o 程序开始: 在子进程中! [root@pid test_namespace]# echo $$ 1 [root@pid test_namespace]# exit exit 已退出 [root@slions_pc1 test_namespace]# echo $$ 10588
此时新进程的pid成为了1,且与宿主机进程互相隔离。
PID namespace 隔离非常实用,它对进程的PID重新标号,即两个不同的namespace下的进程可以有相同的PID。每个PID namespace 都有自己的计算程序。内核为所有的PID namespace 维护了一个树状的结构,最顶层是系统初始化时创建的,被称为root namespace ,而它创建的新的PID namespace 被称为child namespace 树的子节点 而原来的PID namespace就是新建的namespace的父节点。通过这种方式,不同的PID namespace会形成一个层级结构,所属父节点可以看子节点中的进程,可以通过信号等手段对子节点中的进程产生影响,反之子节点无法看到父节点的 PID namespace 中任何内容。
Unix 系统中,PID为1 的为init ,它被称为所有进程的父进程,维护一张进程表,不断检查进程状态,一旦发现某子进程因为父进程错误称为孤儿进程init就会负责收养这个子进程并最终回收资源,结束进程,所以在要实现的容器中,启动第一个进程也要有实现类似init的功能,维护后续启动进程的运行状态 。
执行完pid隔离后在新进程中执行ps aux命令会出现一堆进程,这些是宿主机的所有进程。
1
2
3
4
5
6
7
8
9
10
11
12
13
14
15
16
17
18
19
20
21
22
23
24
25
26
27
28
29
30
31
32
[root@slions_pc1 test_namespace]# ./pid.o 程序开始: 在子进程中! [root@pid test_namespace]# ps aux USER PID %CPU %MEM VSZ RSS TTY STAT START TIME COMMAND root 1 0.0 0.1 193780 6828 ? Ss 11:25 0:02 /usr/lib/systemd/systemd --switched-root --system --deserialize 22 root 2 0.0 0.0 0 0 ? S 11:25 0:00 [kthreadd] root 3 0.0 0.0 0 0 ? S 11:25 0:02 [ksoftirqd/0] root 5 0.0 0.0 0 0 ? S< 11:25 0:00 [kworker/0:0H] root 7 0.0 0.0 0 0 ? S 11:25 0:00 [migration/0] root 8 0.0 0.0 0 0 ? S 11:25 0:00 [rcu_bh] root 9 0.0 0.0 0 0 ? R 11:25 0:00 [rcu_sched] root 10 0.0 0.0 0 0 ? S< 11:25 0:00 [lru-add-drain] root 11 0.0 0.0 0 0 ? S 11:25 0:00 [watchdog/0] root 12 0.0 0.0 0 0 ? S 11:25 0:00 [watchdog/1] root 13 0.0 0.0 0 0 ? S 11:25 0:00 [migration/1] root 14 0.0 0.0 0 0 ? S 11:25 0:03 [ksoftirqd/1] root 16 0.0 0.0 0 0 ? S< 11:25 0:00 [kworker/1:0H] ... [root@pid test_namespace]# ls /proc 1 10628 11122 20 28 3074 42686 4313 4330 43504 49 8029 8801 8833 9631 cmdline fb keys misc schedstat sysvipc 10 10700 11153 21 29 3087 4271 4317 4331 43505 5 8035 8806 8836 9639 consoles filesystems key-users modules scsi timer_list 10148 10704 12 22 2909 3095 4273 4321 43334 43532 51 8042 8813 8864 98 cpuinfo fs kmsg mounts self timer_stats 10149 10706 13 23 2911 3099 42780 4322 43446 4400 53 8052 8814 8876 9926 crypto interrupts kpagecount mpt slabinfo tty 10150 10741 14 24 2947 3104 42799 4325 43466 4413 66 8059 8815 8925 acpi devices iomem kpageflags mtrr softirqs uptime 10152 10865 16 25 3 35 4283 4326 43467 4415 7 8069 8816 9 asound diskstats ioports loadavg net stat version 10582 10924 18 26 3002 36 4286 4327 43468 4423 8 8795 8817 9407 buddyinfo dma irq locks pagetypeinfo swaps vmallocinfo 10586 10940 19 27 3006 37 42922 4328 43484 46 8017 8796 8820 9408 bus driver kallsyms mdstat partitions sys vmstat 10588 11 2 2722 3060 38 4307 4329 43503 48 8024 8797 8821 9411 cgroups execdomains kcore meminfo sched_debug sysrq-trigger zoneinfo [root@pid test_namespace]# kill -9 10940 bash: kill: (10940) - 没有那个进程
这是因为ps命令是从procfs读取数据的,而此时procfs并没有得到隔离,虽然能看到这些进程,但是它们其实是在另一个PID Namespace中,因此无法向这些进程发送信号。
那么我们想让宿主机和新进程的/proc互相隔离如何做呢,使用mount隔离是不是就好了呢?
MOUNT隔离测试 首先先进行MOUNT namespace的隔离测试,添加CLONE_NEWNS来启动MOUNT namespace。
1
2
3
4
5
6
7
8
9
10
11
12
13
14
15
16
17
18
19
20
21
22
23
24
25
26
27
28
29
30
31
32
33
34
35
36
37
38
39
40
[root@slions_pc1 test_namespace]# ls /home/slions/ data hello_world [root@slions_pc1 test_namespace]# cat ns.c #define _GNU_SOURCE #include <sys/mount.h> #include <sys/types.h> #include <sys/wait.h> #include <stdio.h> #include <sched.h> #include <signal.h> #include <unistd.h> #define STACK_SIZE (1024 * 1024) static char child_stack[STACK_SIZE];char * const child_args[] = { "/bin/bash" , NULL }; int child_main (void * args) printf ("在子进程中!\n" ); sethostname("pid" ,12 ); execv(child_args[0 ], child_args); return 1 ; } int main () printf ("程序开始:\n" ); int child_pid = clone(child_main, child_stack + STACK_SIZE, CLONE_NEWNS | CLONE_NEWPID | CLONE_NEWUTS | SIGCHLD, NULL ); waitpid(child_pid, NULL , 0 ); printf ("已退出\n" ); return 0 ; } [root@slions_pc1 test_namespace]# gcc -Wall ns.c -o mnt.o [root@slions_pc1 test_namespace]# ./mnt.o 程序开始: 在子进程中! [root@slions_pc1 test_namespace]# ls /home/slions/ data hello_world
可以看到设置了CLONE_NEWNS后子进程内还是可以看到宿主机的文件系统内容。
Mount Namespace 修改的,是容器进程对文件系统“挂载点”的认知。但是,这也就意味着,只有在“挂载”这个操作发生之后,进程的视图才会被改变。而在此之前,新创建的容器会直接继承宿主机的各个挂载点。
——《白话容器基础-深入理解容器镜像》
测试在容器进程执行前添加重新挂载 /home/slions 目录的操作:
1
2
3
4
5
6
7
int child_main (void * args) printf ("在子进程中!\n" ); sethostname("pid" ,12 ); mount("none" ,"/home/slions" ,"tmpfs" ,0 ,"" ); execv(child_args[0 ], child_args); return 1 ; }
查看编译执行效果:
1
2
3
4
5
[root@slions_pc1 test_namespace]# ./mnt.o 程序开始: 在子进程中! [root@pid test_namespace]# ls /home/slions/
可以看到,这次/home/slions变成了一个空目录,这意味着重新挂载生效了。
那么就可以理解mount namespace是在进程启动时将”系统的/“重新挂载了,这个挂载在容器根目录上、用来为容器进程提供隔离后执行环境的文件系统,就是所谓的镜像,也叫作rootfs(根文件系统)。而切换rootfs的操作会优先使用pivot_root 系统调用,如果系统不支持,才会使用 chroot。
知道了mount namespace 通过隔离文件系统挂载点对隔离文件系统提供支持,可以通过/proc/[pid]/mounts 查看到所在namespace中文件设备统计信息,包括挂载文件的名、文件系统类型、挂载位置等。
1
2
3
4
5
6
7
8
9
10
11
12
13
14
15
16
17
18
19
20
21
22
[root@slions_pc1 test_namespace]# gcc -Wall ns.c -o mnt.o [root@slions_pc1 test_namespace]# ./mnt.o 程序开始: 在子进程中! [root@pid test_namespace]# echo $$ 1 [root@pid test_namespace]# ps -elf |head -15 F S UID PID PPID C PRI NI ADDR SZ WCHAN STIME TTY TIME CMD 4 S root 1 0 0 80 0 - 48445 ep_pol 11:25 ? 00:00:02 /usr/lib/systemd/systemd --switched-root --system --deserialize 22 1 S root 2 0 0 80 0 - 0 kthrea 11:25 ? 00:00:00 [kthreadd] 1 S root 3 2 0 80 0 - 0 smpboo 11:25 ? 00:00:02 [ksoftirqd/0] 1 S root 5 2 0 60 -20 - 0 worker 11:25 ? 00:00:00 [kworker/0:0H] 1 S root 7 2 0 -40 - - 0 smpboo 11:25 ? 00:00:00 [migration/0] 1 S root 8 2 0 80 0 - 0 rcu_gp 11:25 ? 00:00:00 [rcu_bh] 1 S root 9 2 0 80 0 - 0 rcu_gp 11:25 ? 00:00:00 [rcu_sched] 1 S root 10 2 0 60 -20 - 0 rescue 11:25 ? 00:00:00 [lru-add-drain] 5 S root 11 2 0 -40 - - 0 smpboo 11:25 ? 00:00:00 [watchdog/0] 5 S root 12 2 0 -40 - - 0 smpboo 11:25 ? 00:00:00 [watchdog/1] 1 S root 13 2 0 -40 - - 0 smpboo 11:25 ? 00:00:00 [migration/1] 1 S root 14 2 0 80 0 - 0 smpboo 11:25 ? 00:00:03 [ksoftirqd/1] 1 S root 16 2 0 60 -20 - 0 worker 11:25 ? 00:00:00 [kworker/1:0H] 5 S root 18 2 0 80 0 - 0 devtmp 11:25 ? 00:00:00 [kdevtmpfs]
加上CLONE_NEWNS后发现还是可以看到宿主机的/proc信息,前面说了,进程在创建mount namespace时, 会把当前的文件系统结构复制给新的namespace 。新的namespace中所有mount 操作都只影响自身的文件系统,对外界不产生任何影响。这种做法非常严格的实现了隔离,但对某些情况可能并不适用。
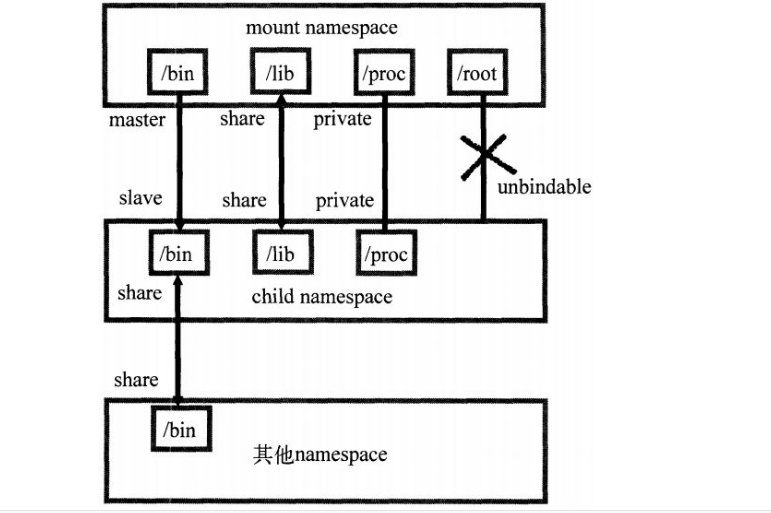
熟悉mount命令的可以知道,mount支持了多种挂载模式
名称
共享挂载
传播事件的挂载对象
从属挂载
接受传播事件的挂载对象
共享/从属挂载
即具备传播事件也具备接受传播事件的挂载对象
私有挂载
既不传播也不接受事件的挂载对象
不可绑定挂载
另一种特殊挂载对象,他们与私有挂载相似,但不允许执行绑定挂载
最上一层的mount namespace 下的 /bin 目录 与 child namespace 通过master slave 方式进行挂载传播,当mount namespace中的/bin 目录发生变化时,发生的挂载事件能够自动传播到 child namespace中;/lib 目录使用完全共享挂载,各 namespace 之间发生变化时都会影响;proc 目录使用私有挂载传播方式,各namespace之间互相隔离;最后/root目录一般管理员所有,不能让其他namespace挂载绑定。
了解了上述,我们可以通过在这个PID namespace里挂载procfs来解决。
1
2
3
4
5
6
7
8
9
10
11
12
13
14
15
16
17
18
19
20
21
22
23
24
25
26
27
28
29
[root@slions_pc1 test_namespace]# ./mnt.o 程序开始: 在子进程中! [root@pid test_namespace]# ls /proc 1 10628 11122 20 28 3074 42686 4313 4330 43805 49 8029 8801 8833 9631 cmdline fb keys misc schedstat sysvipc 10 10700 11153 21 29 3087 4271 4317 4331 43806 5 8035 8806 8836 9639 consoles filesystems key-users modules scsi timer_list 10148 10704 12 22 2909 3095 4273 4321 43468 43833 51 8042 8813 8864 98 cpuinfo fs kmsg mounts self timer_stats 10149 10706 13 23 2911 3099 42780 4322 43704 4400 53 8052 8814 8876 9926 crypto interrupts kpagecount mpt slabinfo tty 10150 10741 14 24 2947 3104 42799 4325 43713 4413 66 8059 8815 8925 acpi devices iomem kpageflags mtrr softirqs uptime 10152 10865 16 25 3 35 4283 4326 43739 4415 7 8069 8816 9 asound diskstats ioports loadavg net stat version 10582 10924 18 26 3002 36 4286 4327 43741 4423 8 8795 8817 9407 buddyinfo dma irq locks pagetypeinfo swaps vmallocinfo 10586 10940 19 27 3006 37 42922 4328 43761 46 8017 8796 8820 9408 bus driver kallsyms mdstat partitions sys vmstat 10588 11 2 2722 3060 38 4307 4329 43782 48 8024 8797 8821 9411 cgroups execdomains kcore meminfo sched_debug sysrq-trigger zoneinfo [root@pid test_namespace]# mount --make-private -t proc proc /proc/ [root@pid test_namespace]# ls /proc 1 buddyinfo consoles diskstats fb iomem kcore kpagecount mdstat mounts pagetypeinfo scsi stat sysvipc uptime zoneinfo 30 bus cpuinfo dma filesystems ioports keys kpageflags meminfo mpt partitions self swaps timer_list version acpi cgroups crypto driver fs irq key-users loadavg misc mtrr sched_debug slabinfo sys timer_stats vmallocinfo asound cmdline devices execdomains interrupts kallsyms kmsg locks modules net schedstat softirqs sysrq-trigger tty vmstat [root@pid test_namespace]# exit exit 已退出 [root@slions_pc1 test_namespace]# ls /proc ls: 无法读取符号链接/proc/self: 没有那个文件或目录 acpi cgroups crypto driver fs irq key-users loadavg misc mtrr sched_debug slabinfo sys timer_stats vmallocinfo asound cmdline devices execdomains interrupts kallsyms kmsg locks modules net schedstat softirqs sysrq-trigger tty vmstat buddyinfo consoles diskstats fb iomem kcore kpagecount mdstat mounts pagetypeinfo scsi stat sysvipc uptime zoneinfo bus cpuinfo dma filesystems ioports keys kpageflags meminfo mpt partitions self swaps timer_list version
此时可以看到子进程内的/proc下只有自己namespace下的进程信息了,但是由于文件系统挂载点没有隔离,宿主机看到的procfs也会是这个新的procfs,所以我们应该先在宿主机执行mount --make-private -t proc proc /proc/
IPC、USER、NET隔离 具体的测试步骤同上,不展开说了,感兴趣的可以自行测试下。
IPC:
进程间通信(Inter-Process Communication,IPC)涉及的IPC资源包括常见的信号量、消息队列和共享内存。申请IPC资源就申请了一个全局唯一的32位ID,所以IPC namespace中实际上包含了系统IPC标识符以及实现POSIX消息队列的文件系统。在同一个IPC namespace下的进程彼此可见,不同IPC namespace下的进程则互相不可见。
USER:
User namespace 主要是隔离用户的用户组ID。也就是说,一个进程的User ID 和Group ID 在User namespace 内外可以是不同的。比较常用的是,在宿主机上以一个非root用户运行创建一个User namespace,然后在User namespace里面却映射成root 用户。这样意味着,这个进程在User namespace里面有root权限,但是在User namespace外面却没有root的权限。
NET:
Network namespace 是用来隔离网络设备,IP地址端口等网络栈的namespace。Network namespace 可以让每个容器拥有自己独立的网络设备(虚拟的),而且容器内的应用可以绑定到自己的端口,每个 namesapce 内的端口都不会互相冲突。在宿主机上搭建网桥后,就能很方便的实现容器之间的通信,而且每个容器内的应用都可以使用相同的端口。